Slider

NYC Cookies

Long time no see! I'm happy to finally be posting on the blog and this time I've decided to do something a little different. I'll be reviewing these NYC style cookies I ordered from Crumbs and Doilies Bakery in Soho. 
Packaging


Crumbs and Dollies

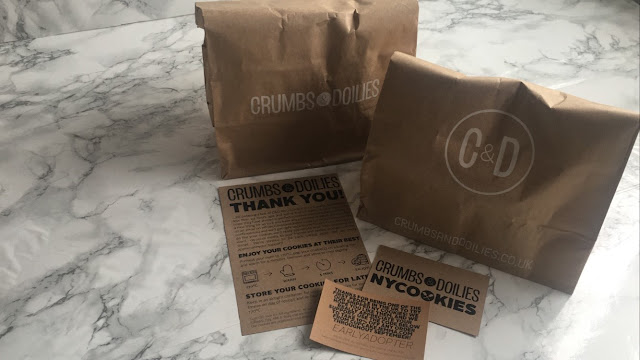
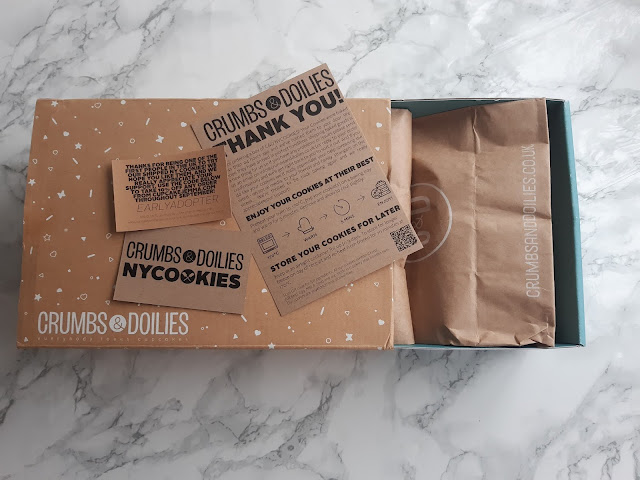
About a month ago Cupcake Jemma, (owner of Crumbs and Doilies) uploaded a video onto her YouTube channel, stating that the bakery planned to start shipping freshly baked cookies across the country (UK). But first they wanted to do a free trial run and make sure they had an efficient system in place. I signed up to bet notified and got an email informing me I had been selected to receive their taster cookies and the cookies were sent out to me couple of days later. My delivery of cookies came in a cardboard box and inside were six flavours of NYC style cookies; birthday cake, chocolate chip, red velvet, double chocolate, raspberry and white chocolate & oatmeal and lastly raisin. The cookies came in C&D original cardboard plastic and the cookies came placed in two thick brown paper bags (3 cookies in each bag) with the crumbs and dollies logo and inside both bags each cookie individually came in its own little brown paper bag inside. No plastic, yay! All cookies were made less then 24 hours prior to their delivery and were shipped to me via next day delivery via DPD.  Per the instructions provided on a brown piece of paper in the box I heated them in the oven at 170⁰C for 5 minutes to warm them up and had a little cookie feast with the fam.

A breakdown of each NYC cookie:

Birthday Cake: A nice vanilla cookie with sprinkles, white and caramelised white chocolate. This cookie was absolutely delicious and was by far one of my favourite cookie out of the 6. A downside to this cookie was that it lacked enough caramelised white chocolate but there was enough inside for me to know it was there. The cookie had a nice crumbly texture but soft on the inside and overall a nice golden colour.

Chocolate Chip: My second favourite cookie out of the batch, a soft and delicious cookie chucked full of chocolate chips, you couldn't miss one in every, bite which is a good thing! Two types of milk chocolate seemed to have been used in this cookie, One with a lower cocoa percentage and another with a slightly higher. The use of two chocolates of different cocoa percentages definitely enhanced the flavour of the cookie making it taste more rich. If you're a chocolate fan you'll deffo love this one. 

Red Velvet: This cookie had a touch of cocoa powder, and instead of the usual cream cheese you'd expect in a red velvet this cookie has white chocolate chips instead. This cookie had a nice subtle chocolate flavour, but was a little overpowered by the white chocolate. Nice red colour too. This was a good cookie, but for me it was a tad too sweet for my liking.

Double Chocolate: Hands down the best cookie I've ever had, and my favourite out the 6. This cookie was super dense and chocolatey, almost like a brownie. The black cocoa powder really gave it an extra kick in my opinion. there was a a complimentary sweet. The milk chocolate chips gave it the right amount of sweetness. This is a cookie i would highly recommend you try for yourself .

Raspberry and White Chocolate: Nice sweet and tart flavour thanks to the combo of raspberry and white chocolate. This cookie was nice to eat. It had a good crumbly texture and nice golden colour. This was my first time trying such a combo but I did enjoy but not enough for me to eat again.

Oatmeal and Raisin: I'm not a fan of this flavour personally, so I'm relying on my sister's taste buds here. She really enjoyed this cookie more than I did. She mentioned it had a sweet nutty flavour thanks to the oats and raisins at play in this cookie. She also mentioned compared to the other cookies this felt very filling almost like a breakfast biscuit you can get at the supermarket. If you enjoy flapjacks you'll definitely enjoy eating this cookie.


You can purchase the 6 NYC cookies on Cupcake Jemma's website here or the Crumbs and Dollies website here now for £27 pounds, with shipping at £6, depending on where you live in the UK. I hope they introduce the option to curate your own boxes of cookies in the future as there were some flavours I enjoyed more than others. These were absolutely delicious and I  recommend others give them a try.


Kristen xx

Review: Crumbs and Dollies NYC Cookies

Saturday, September 5, 2020

NYC Cookies

Long time no see! I'm happy to finally be posting on the blog and this time I've decided to do something a little different. I'll be reviewing these NYC style cookies I ordered from Crumbs and Doilies Bakery in Soho. 

Packaging


Crumbs and Dollies

About a month ago Cupcake Jemma, (owner of Crumbs and Doilies) uploaded a video onto her YouTube channel, stating that the bakery planned to start shipping freshly baked cookies across the country (UK). But first they wanted to do a free trial run and make sure they had an efficient system in place. I signed up to bet notified and got an email informing me I had been selected to receive their taster cookies and the cookies were sent out to me couple of days later. My delivery of cookies came in a cardboard box and inside were six flavours of NYC style cookies; birthday cake, chocolate chip, red velvet, double chocolate, raspberry and white chocolate & oatmeal and lastly raisin. The cookies came in C&D original cardboard plastic and the cookies came placed in two thick brown paper bags (3 cookies in each bag) with the crumbs and dollies logo and inside both bags each cookie individually came in its own little brown paper bag inside. No plastic, yay! All cookies were made less then 24 hours prior to their delivery and were shipped to me via next day delivery via DPD.  Per the instructions provided on a brown piece of paper in the box I heated them in the oven at 170⁰C for 5 minutes to warm them up and had a little cookie feast with the fam.

A breakdown of each NYC cookie:

Birthday Cake: A nice vanilla cookie with sprinkles, white and caramelised white chocolate. This cookie was absolutely delicious and was by far one of my favourite cookie out of the 6. A downside to this cookie was that it lacked enough caramelised white chocolate but there was enough inside for me to know it was there. The cookie had a nice crumbly texture but soft on the inside and overall a nice golden colour.

Chocolate Chip: My second favourite cookie out of the batch, a soft and delicious cookie chucked full of chocolate chips, you couldn't miss one in every, bite which is a good thing! Two types of milk chocolate seemed to have been used in this cookie, One with a lower cocoa percentage and another with a slightly higher. The use of two chocolates of different cocoa percentages definitely enhanced the flavour of the cookie making it taste more rich. If you're a chocolate fan you'll deffo love this one. 

Red Velvet: This cookie had a touch of cocoa powder, and instead of the usual cream cheese you'd expect in a red velvet this cookie has white chocolate chips instead. This cookie had a nice subtle chocolate flavour, but was a little overpowered by the white chocolate. Nice red colour too. This was a good cookie, but for me it was a tad too sweet for my liking.

Double Chocolate: Hands down the best cookie I've ever had, and my favourite out the 6. This cookie was super dense and chocolatey, almost like a brownie. The black cocoa powder really gave it an extra kick in my opinion. there was a a complimentary sweet. The milk chocolate chips gave it the right amount of sweetness. This is a cookie i would highly recommend you try for yourself .

Raspberry and White Chocolate: Nice sweet and tart flavour thanks to the combo of raspberry and white chocolate. This cookie was nice to eat. It had a good crumbly texture and nice golden colour. This was my first time trying such a combo but I did enjoy but not enough for me to eat again.

Oatmeal and Raisin: I'm not a fan of this flavour personally, so I'm relying on my sister's taste buds here. She really enjoyed this cookie more than I did. She mentioned it had a sweet nutty flavour thanks to the oats and raisins at play in this cookie. She also mentioned compared to the other cookies this felt very filling almost like a breakfast biscuit you can get at the supermarket. If you enjoy flapjacks you'll definitely enjoy eating this cookie.


You can purchase the 6 NYC cookies on Cupcake Jemma's website here or the Crumbs and Dollies website here now for £27 pounds, with shipping at £6, depending on where you live in the UK. I hope they introduce the option to curate your own boxes of cookies in the future as there were some flavours I enjoyed more than others. These were absolutely delicious and I  recommend others give them a try.


Kristen xx


Anyone else miss spontaneous brunch dates with friends, or just me? Sigh, I know I do! Whats says brunch better than some yummy french toast, a go to choice of mine when dinning out for brunch; Christopher's in Covent Garden have theee most delicious french toast I've ever tried. As you can see my brunch blues got the better of me the other day, so I attempted to making my own french toast. Easy and quick to make, topped with icing powder, a scoop of delicious vanilla ice cream and homemade caramel sauce (recipe will be uploaded soon). This recipe produces a single serving, but can easily be doubled/tripled etc. Usually you'll see French toast being made with thicker breads such as brioche or challah, but this recipe is designed to make do with what most people will have at home.

Recipe 

Ingredients: 
  • 2-3 slices of stale/dried bread
  • 1 large egg
  • 1 tbsp of sugar
  • 1/4 cup of whole milk (or any milk of your choice is fine)
  • 1/4 tsp of vanilla extract
  • 1/4 tsp of freshly grated nutmeg
  • 1/8 tsp of cinnamon
  • Butter/oil for frying
Topping
  • Powdered Sugar
  • Scoop vanilla ice cream
  • Homemade Caramel Sauce

Method

  1. This step is optional and only necessary if, like me, you do not have any stale bread lying around. If so, place 3 slices of white bread onto a baking sheet and place into an oven preheated at gas mark 6. Bake the bread for 2 minutes on each side, you want the bread to be dried not toasted. Then remove from the oven and set aside to cool. 
  2. In a wide bottom bowl, add egg and whisk. After that, add sugar and whisk until combined. Then add milk and mix until combined.
  3. Next add cinnamon, freshly grated nutmeg and vanilla to the mixture and whisk.
  4. Place bread into the custard mixture and allow to coat lightly, once coated turn over the bread and repeat then place to the side ready to be fried. Repeat this step with the remaining bread.
  5. In a frying pan (big enough to fit 2 slices of bread) add butter and oil to the frying pan at medium heat, allow the butter and oil to coat the pan entirely.
  6. Place the two pieces of bread on the pan and cook for 1 minute on each side until golden. Once all slices of bread are cooked, decorate with whatever toppings you like, i topped mine with icing sugar, vanilla ice cream and caramel sauce.
  7. Last Step, bon appetit!  


This recipe turned out really good, 10/10. I may have to start hosting brunches at home after lock-down.

Let me know in the comments what you like to top your french toast with and whether you're thinking of using my recipe to make your own french toast, would love to know how it went.

- Kristen x


Brunch at Home - French Toast with Vanilla Ice Cream and Caramel Sauce

Wednesday, May 6, 2020


Anyone else miss spontaneous brunch dates with friends, or just me? Sigh, I know I do! Whats says brunch better than some yummy french toast, a go to choice of mine when dinning out for brunch; Christopher's in Covent Garden have theee most delicious french toast I've ever tried. As you can see my brunch blues got the better of me the other day, so I attempted to making my own french toast. Easy and quick to make, topped with icing powder, a scoop of delicious vanilla ice cream and homemade caramel sauce (recipe will be uploaded soon). This recipe produces a single serving, but can easily be doubled/tripled etc. Usually you'll see French toast being made with thicker breads such as brioche or challah, but this recipe is designed to make do with what most people will have at home.

Recipe 

Ingredients: 
  • 2-3 slices of stale/dried bread
  • 1 large egg
  • 1 tbsp of sugar
  • 1/4 cup of whole milk (or any milk of your choice is fine)
  • 1/4 tsp of vanilla extract
  • 1/4 tsp of freshly grated nutmeg
  • 1/8 tsp of cinnamon
  • Butter/oil for frying
Topping
  • Powdered Sugar
  • Scoop vanilla ice cream
  • Homemade Caramel Sauce

Method

  1. This step is optional and only necessary if, like me, you do not have any stale bread lying around. If so, place 3 slices of white bread onto a baking sheet and place into an oven preheated at gas mark 6. Bake the bread for 2 minutes on each side, you want the bread to be dried not toasted. Then remove from the oven and set aside to cool. 
  2. In a wide bottom bowl, add egg and whisk. After that, add sugar and whisk until combined. Then add milk and mix until combined.
  3. Next add cinnamon, freshly grated nutmeg and vanilla to the mixture and whisk.
  4. Place bread into the custard mixture and allow to coat lightly, once coated turn over the bread and repeat then place to the side ready to be fried. Repeat this step with the remaining bread.
  5. In a frying pan (big enough to fit 2 slices of bread) add butter and oil to the frying pan at medium heat, allow the butter and oil to coat the pan entirely.
  6. Place the two pieces of bread on the pan and cook for 1 minute on each side until golden. Once all slices of bread are cooked, decorate with whatever toppings you like, i topped mine with icing sugar, vanilla ice cream and caramel sauce.
  7. Last Step, bon appetit!  


This recipe turned out really good, 10/10. I may have to start hosting brunches at home after lock-down.

Let me know in the comments what you like to top your french toast with and whether you're thinking of using my recipe to make your own french toast, would love to know how it went.

- Kristen x


My go-to brownie recipe, rich, fudgy and seriously chocolaty.

I’ve tried many brownie recipes over the years; some cakey, some fudgy, some which called for cocoa powder only, others just melted chocolate. But after a few trial and errors I’ve developed my perfect brownie recipe, which calls for both cocoa powder and melted chocolate. These brownies have just the right amount of fudginess, soft and do not fall apart. Using both cocoa powder and melted chocolate means the brownies are super chocolaty, I've also added milk chocolate chips balance out the richness from both the cocoa powder and dark chocolate.

Recipe

Ingredients:

  • 85g of dark chocolate (70% cocoa solids)
  • 85g of unsalted butter
  • 165g of caster sugar
  • 2 large eggs
  • ½ tsp of vanilla extract
  • 25g of cocoa powder
  • 60g of plain flour

  • ¼ tsp of baking powder
  • A pinch of salt
  • 40g of milk chocolate chips

Method

  1. Preheat oven to 180C/350F, gas mark 4.
  2. Grease and line a 7 inch square pan with unsalted butter.
  3. Chop the chocolate and place into a heatproof bowl alongside room temperature butter, place into the microwave for 1 minute, stopping every 25 seconds to mix and prevent mixture from burning.
  4. Once chocolate is fully melted, leave aside to cool.
  5. Add caster sugar, eggs and vanilla into a large mixing bowl and mix until the mixture is fluffy and pale, this is easiest done with a hand mixer, do this for about 5 minutes.
  6. Add the chocolate mixture to the egg mixture and mix until combined.
  7. Sieve together all of the dry ingredients and add to the wet mixture in two additions. Folding the carefully with each addition, but be careful not to over mix!
  8. Place into the middle of the oven and bake for at least 25 minutes.
  9. After 25 minutes check the middle of the brownies with a skewer, it should not be completely clean. When finished place onto a cooling rack and allow to sit for a least an hour before cutting and enjoy!
My own brownies turned out great, a beautiful light brown crust and the perfect amount of fudginess. Note: I baked my batch for a additional 7 minutes so that the middle of the brownies was not too wet, but I wouldn’t recommend going 10 minutes over the initial baking time as the brownies on the edge will start to dry out as they have direct heat contact.
Let me know in the comments down below, what you for brownie preference is.
Happy baking, enjoy!
Kristen x

Chocolate Fudgy Brownies

Monday, May 4, 2020

My go-to brownie recipe, rich, fudgy and seriously chocolaty.

I’ve tried many brownie recipes over the years; some cakey, some fudgy, some which called for cocoa powder only, others just melted chocolate. But after a few trial and errors I’ve developed my perfect brownie recipe, which calls for both cocoa powder and melted chocolate. These brownies have just the right amount of fudginess, soft and do not fall apart. Using both cocoa powder and melted chocolate means the brownies are super chocolaty, I've also added milk chocolate chips balance out the richness from both the cocoa powder and dark chocolate.

Recipe

Ingredients:

  • 85g of dark chocolate (70% cocoa solids)
  • 85g of unsalted butter
  • 165g of caster sugar
  • 2 large eggs
  • ½ tsp of vanilla extract
  • 25g of cocoa powder
  • 60g of plain flour

  • ¼ tsp of baking powder
  • A pinch of salt
  • 40g of milk chocolate chips

Method

  1. Preheat oven to 180C/350F, gas mark 4.
  2. Grease and line a 7 inch square pan with unsalted butter.
  3. Chop the chocolate and place into a heatproof bowl alongside room temperature butter, place into the microwave for 1 minute, stopping every 25 seconds to mix and prevent mixture from burning.
  4. Once chocolate is fully melted, leave aside to cool.
  5. Add caster sugar, eggs and vanilla into a large mixing bowl and mix until the mixture is fluffy and pale, this is easiest done with a hand mixer, do this for about 5 minutes.
  6. Add the chocolate mixture to the egg mixture and mix until combined.
  7. Sieve together all of the dry ingredients and add to the wet mixture in two additions. Folding the carefully with each addition, but be careful not to over mix!
  8. Place into the middle of the oven and bake for at least 25 minutes.
  9. After 25 minutes check the middle of the brownies with a skewer, it should not be completely clean. When finished place onto a cooling rack and allow to sit for a least an hour before cutting and enjoy!
My own brownies turned out great, a beautiful light brown crust and the perfect amount of fudginess. Note: I baked my batch for a additional 7 minutes so that the middle of the brownies was not too wet, but I wouldn’t recommend going 10 minutes over the initial baking time as the brownies on the edge will start to dry out as they have direct heat contact.
Let me know in the comments down below, what you for brownie preference is.
Happy baking, enjoy!
Kristen x


Hi, I'm Kristen a 19 year old self taught baker. I started this blog to share recipes and document my progress as a baker. Every sunday I'll be sharing various cake, cupcakes, pastries and decorating techniques here on my blog.

Stay tuned x

Friday, January 24, 2020


Hi, I'm Kristen a 19 year old self taught baker. I started this blog to share recipes and document my progress as a baker. Every sunday I'll be sharing various cake, cupcakes, pastries and decorating techniques here on my blog.

Stay tuned x

Instagram